Adding water to whisky isn’t about dilution; it’s a controlled chemical event that restructures the liquid to force key flavor molecules to the surface.
- The “opening up” effect is driven by the behavior of amphipathic compounds (like the smoky molecule guaiacol), which are repelled by excess water and flee to the liquid-air interface where they can be smelled.
- Scientific studies show an optimal concentration exists, often around 27% ABV, where these aromatic compounds are most present at the surface. Over-dilution drowns them.
Recommendation: To optimize your nosing experience, use a pipette to add a few drops of low-mineral water, swirl, wait 30-60 seconds, and reassess the aroma profile.
For any serious whisky enthusiast, the ritual is familiar: a splash of water is added to a dram, and suddenly, a bouquet of aromas blossoms where before there was only the sharp scent of alcohol. The common wisdom says the water “opens up” the whisky. While true, this explanation is scientifically incomplete. It treats a fascinating process of physical chemistry as a vague, almost magical act. The truth is far more precise and predictable, rooted in the molecular dance between ethanol, water, and the hundreds of aromatic compounds that give a whisky its character.
The sensation of “alcohol burn” that can overwhelm the nose is certainly a factor, and reducing the alcohol by volume (ABV) does temper it. However, this is only a small part of the story. The real transformation happens at an invisible, molecular level. Whisky is a complex solution, and altering its composition by adding water forces a dramatic reorganization. This is not merely watering it down; it is strategically disrupting an established equilibrium to encourage specific, desirable molecules to make their presence known.
The key lies in understanding the properties of flavor compounds themselves. Many of the most important ones, particularly the smoky and spicy phenolic compounds like guaiacol, are amphipathic. This means they have a dual nature: one part of the molecule is attracted to water (hydrophilic), and the other is repelled by it (hydrophobic). In a high-proof whisky, these molecules are comfortably dispersed within the ethanol-water matrix. When you add more water, you change the rules of the game, forcing these molecules to the surface where they can finally be detected by your nose.
This article will deconstruct that phenomenon from a chemical physics perspective. We will explore why non-chill filtered whiskies turn cloudy, the correct technique for adding water, the impact of mineral content, the critical error of over-dilution, and even how these principles of dilution apply to classic cocktails. By the end, you will not just be adding water to your whisky; you will be conducting a controlled chemical experiment in your glass.
To navigate this scientific exploration of whisky, the following sections will break down each critical aspect of the dilution process, from the visual cues to the precise calculations used by professionals.
Summary: The Science of Whisky Dilution
- Why Does Non-Chill Filtered Whisky Turn Cloudy When You Add Water?
- How to Use a Pipette to Add Exactly One Drop of Water?
- Tap Water or Spring Water: Which Mineral Content Alters the Flavor?
- The Dilution Error: How Much Water Is Too Much for a 43% Whisky?
- When to Add Water: Immediately or After the First Sip?
- How to Add Water Without Creating “Soapy” Flavors in the Bottle?
- Why Stirring for 30 Seconds Dilutes Less Than Shaking for 10 Seconds?
- How to Calculate Dilution to Hit the Perfect ABV for a Martini?
Why Does Non-Chill Filtered Whisky Turn Cloudy When You Add Water?
The cloudy haze, or “louching,” that appears in some whiskies when water or ice is added is often a sign of a quality, minimally processed spirit. This phenomenon is characteristic of non-chill filtered (NCF) whiskies. During chill-filtration, a whisky is cooled to near 0°C and passed through a fine filter to remove certain long-chain esters, fatty acids, and proteins. While this ensures the whisky remains perfectly clear even when cold, it can also strip out compounds that contribute to mouthfeel and flavor.
In an NCF whisky, these compounds remain in the solution. At room temperature and cask strength, they are happily dissolved within the ethanol-water matrix. However, these molecules are less soluble at lower temperatures or lower alcohol concentrations. When you add cool water or ice, you are doing both: lowering the temperature and the ABV. This change in conditions causes the fatty acids and esters to precipitate out of the solution. They don’t disappear; instead, they clump together to form stable colloidal suspensions known as micelles. These microscopic groupings are large enough to scatter light, which we perceive as cloudiness or haze.
This effect is highly dependent on the alcohol concentration. While not a universal law, research indicates that whiskies bottled at or above 46% ABV generally have a high enough ethanol content to keep these flavor-conferring compounds dissolved, preventing cloudiness at room temperature. Dropping below this threshold with dilution is what triggers the beautiful, hazy reaction. Far from being a flaw, this clouding is a visual confirmation that the whisky retains many of its original, natural congeners.
How to Use a Pipette to Add Exactly One Drop of Water?
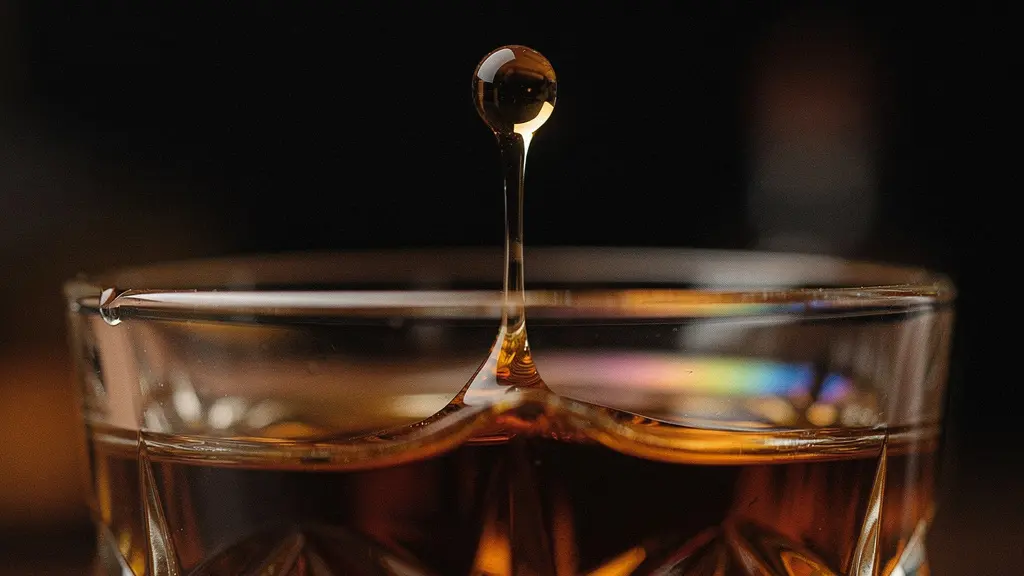
If adding water is a scientific act, then the pipette is the scientist’s chosen instrument. While simply splashing water from a tap into your glass will work, it offers no precision. You risk over-diluting the whisky in an instant, ruining the very experience you seek to enhance. A whisky pipette, or dropper, allows for the controlled addition of water, drop by drop, enabling you to find the exact “sweet spot” for any given spirit.
The technique is straightforward but requires a measured approach. Follow these steps for professional-level dilution:
- Start Neat: Always nose and taste the whisky in its original state first. This establishes your baseline and allows you to appreciate the transformation.
- Prepare the Pipette: Submerge the tip of the pipette into your water source (ideally a small jug of neutral, soft spring water) and squeeze the bulb to draw a small amount of water into the glass tube.
- Add a Single Drop: Hold the pipette directly over the center of your whisky glass and gently squeeze the bulb to release just one drop. Observe how the water drop creates schlieren lines as it mixes with the higher-density spirit.
- Swirl and Wait: Gently swirl the glass to incorporate the water. Covering the top with your hand can help trap the newly released volatile aromas. Crucially, wait for 30 to 60 seconds. The molecular rearrangement is not instantaneous.
- Re-evaluate: Nose the whisky again. Note any new aromas that have come to the forefront. Are the fruity esters more prominent? Has a smoky phenol emerged? Take a small sip to assess the change on the palate.
- Repeat if Necessary: If the alcohol is still too dominant or the aromas seem muted, repeat the process by adding another single drop. Continue this iterative process until the whisky reaches its peak expression.
This methodical process transforms a simple drink into a sensory exploration. The goal is not to reach a specific, predetermined level of dilution, but to observe the evolution of the spirit and stop when it reveals its most complex and pleasing character. Using a pipette ensures you don’t overshoot that perfect moment.

As the image perfectly captures, the addition of water is an act of precision. Each drop is a catalyst, initiating a chain reaction within the glass that reorders the very structure of the liquid and unlocks its hidden aromatic potential. This level of control is impossible to achieve with less precise methods.
Tap Water or Spring Water: Which Mineral Content Alters the Flavor?
Just as the quality of grapes is paramount to wine, the quality of water is critical when diluting whisky. Adding water with a high mineral content or chemical additives can drastically and negatively alter the flavor profile of a fine spirit. The goal is to use a neutral agent that dilutes the alcohol without introducing any new, competing flavors.
Tap water is often a poor choice. It can contain chlorine, which imparts a distinct chemical or medicinal taste. Furthermore, “hard” tap water is rich in minerals like calcium and magnesium. While harmless to drink, these minerals can react with the compounds in the whisky, sometimes creating a slightly salty or metallic note that masks the delicate esters and phenols. In fact, analysis suggests that water with more than 89 ppm of calcium and magnesium can contribute to unwanted cloudiness and flavor alteration. At the distillery, the water used to cut the spirit to bottling strength is almost always deionized or distilled to ensure absolute neutrality.
The ideal choice for home dilution is a soft, neutral spring water. Look for bottled waters with a low Total Dissolved Solids (TDS) content, often labeled as “light” or “low-mineral.” These waters act as a blank canvas, allowing the whisky’s true character to shine through without interference. A good rule of thumb is to choose a water that has little to no discernible taste on its own.
The following table, based on common water types, illustrates how mineral content can influence the outcome. The measurement mg/L (milligrams per liter) is roughly equivalent to ppm (parts per million) for water.
| Water Type | Mineral Content (TDS) | Impact on Whisky |
|---|---|---|
| Distilled/Deionized Water | ~0 mg/L | Perfectly neutral, zero flavor impact. The professional’s choice. |
| Low-Mineral Spring Water (e.g., Volvic) | <150 mg/L | Very low impact, excellent choice for tasting. |
| Typical Tap Water (Hard) | 200-400+ mg/L | Can introduce mineral, chlorine, or metallic notes. Not recommended. |
| High-Mineral Water (e.g., San Pellegrino) | >500 mg/L | Will significantly alter the whisky’s flavor and mouthfeel. Avoid. |
Ultimately, selecting a soft, neutral water ensures that the changes you perceive in the whisky are due to the dilution itself, and not from the introduction of external flavor compounds. It preserves the integrity of the spirit and the scientific nature of your tasting experiment.
The Dilution Error: How Much Water Is Too Much for a 43% Whisky?
The most significant mistake in adding water to whisky is using too much. While a few drops can elevate the aromatic experience, excessive dilution can irrevocably destroy it. This isn’t a matter of opinion but of physical chemistry. The “opening up” effect relies on a delicate balance, and there is a scientifically identified point of diminishing returns.
The core of this phenomenon was famously modeled in a 2017 Swedish study. Researchers focused on guaiacol, a phenolic compound responsible for the smoky, peaty aromas in many whiskies. As an amphipathic molecule, it prefers to be near ethanol rather than water. In a high-proof solution (above ~59% ABV), the ethanol concentration is so high that guaiacol molecules remain dispersed throughout the liquid. As you add water and the ABV drops, the environment becomes less hospitable for the guaiacol. To escape the excess water, it migrates to the liquid-air interface—the surface of the whisky in your glass. This is where aromas are released and detected by the nose.
However, this effect has a peak. The study found that the concentration of guaiacol at the surface was highest when the whisky was diluted to around 27% ABV. Below this concentration, there isn’t enough ethanol to keep the guaiacol “pushed” to the surface; it simply becomes lost and overly diluted within the larger volume of water. While every whisky is different, this provides a powerful scientific guideline: the aromatic sweet spot for many spirits lies somewhere between 25% and 30% ABV. For a standard 43% ABV whisky, this means adding about 1 part water to 2 parts whisky would drop it to ~28.7% ABV, right in the optimal zone defined by the 2017 Swedish study, which referenced a peak guaiacol concentration at 27% ABV.
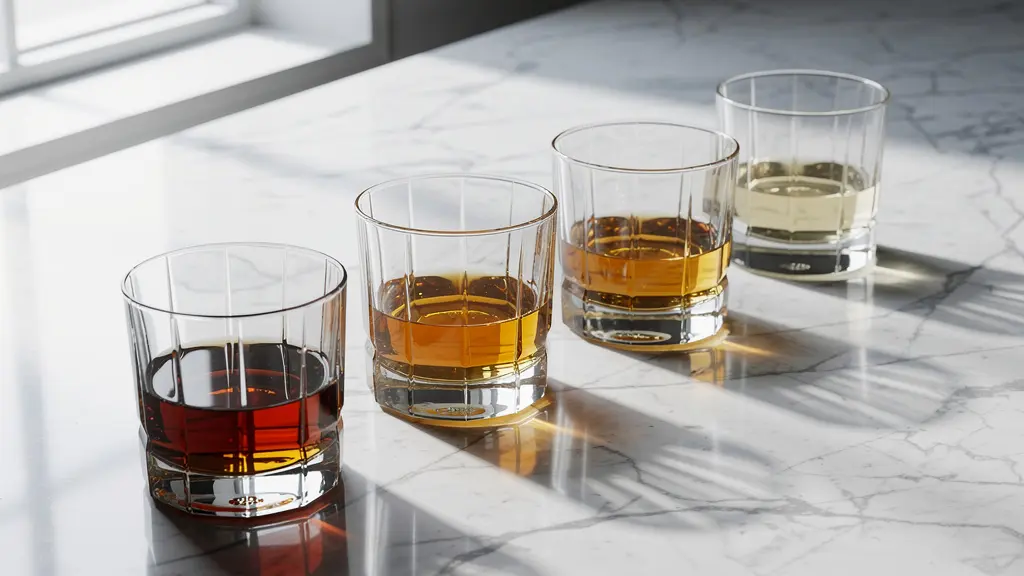
As the gradient in the image suggests, there is a visual and aromatic consequence to over-dilution. A separate study from Washington State University confirmed this from a sensory perspective. Their research concluded that once a whisky is diluted by more than 20% of its volume (e.g., adding more than 10ml of water to a 50ml dram), the unique characteristics of different whiskies begin to vanish. Tom Collins, one of the study’s authors, noted that “By the time you get to 60/40 whisky to water, the whiskies are not differentiated by the panelists; they begin to smell the same.” This finding, detailed in a Washington State University study, reinforces that over-dilution erases a whisky’s identity.
When to Add Water: Immediately or After the First Sip?
When it comes to nosing and tasting cask strength whisky, I often use water as a key for unlocking the full aroma and flavor potential of the spirit.
– SMWSA (Scotch Malt Whisky Society of America), Cask Curriculum: Whisky & Water
The question of *when* to add water is best answered by adopting a structured, professional tasting methodology. Adding water is not a preparatory step to be done automatically; it is an active part of the evaluation process. The most effective approach is to experience the whisky in two distinct phases: neat, and then diluted. This allows you to create a “before and after” snapshot in your mind, fully appreciating the transformation that occurs.
Professionals often refer to this as the “two-nose” technique. It’s a systematic way to deconstruct the spirit’s aromatic profile. The first nosing, done neat, reveals the most volatile compounds—the lightest, most ethereal top notes that fly out of the glass first. These might include bright citrus, fresh floral notes, or sharp grassy scents. A sip at this stage also establishes the baseline mouthfeel and intensity of the spirit at its bottled strength.
Only after this initial assessment should you introduce water. As we’ve established, the water’s role is to suppress the ethanol’s aggressiveness and, more importantly, to encourage heavier, oilier, and often more complex aromas to rise to the surface. These are the compounds that were previously “locked” in the solution. After adding a few drops and waiting up to a minute, the second nosing will often reveal a completely different character: richer fruits, deeper spices, earthy peat, or savory, waxy notes that were previously hidden. This structured approach ensures you miss nothing.
Your Action Plan: The Two-Nose Tasting Method
- First Assessment (Neat): Pour your dram. Nose it to identify the most volatile top notes (e.g., citrus, floral, grass). Take a small sip to gauge its initial intensity and mouthfeel. Document these primary impressions.
- Controlled Dilution: Using a pipette, add one or two drops of neutral, soft water. Swirl the glass gently to integrate the water into the ethanol matrix.
- Allow for Reaction: Wait for 30 to 60 seconds. This is a critical pause that allows for the molecular rearrangement and for the less volatile, amphipathic compounds to migrate to the surface.
- Second Assessment (Diluted): Nose the whisky again, deeply. Search for new aromas that have emerged. Have heavier notes like leather, tobacco, or dark chocolate appeared? Has the fruit character shifted from fresh to stewed?
- Document the Transformation: Take another sip and note the changes in flavor and mouthfeel. Is it smoother? Do new tastes emerge on the palate? Comparing these notes to your initial assessment reveals the whisky’s full complexity.
How to Add Water Without Creating “Soapy” Flavors in the Bottle?
A common concern among those new to diluting whisky is the fear of creating off-flavors, particularly a “soapy” or “slippery” taste. It is crucial to understand that this perception almost never comes from the whisky or the water itself. Clean, neutral water does not chemically react with whisky to create soap. The culprit is almost always external contamination or the wrong type of treated water.
The most frequent cause of soapiness is simply residue on the glassware. If a glass is washed with detergent and not rinsed with extreme thoroughness, a microscopic film of soap can remain. When the whisky is poured, it dissolves this residue, which then imparts its characteristic unpleasant taste. The solution is simple: rinse your tasting glasses with hot water multiple times and allow them to air dry, or polish them with a dedicated, clean microfiber cloth. Never use a cloth that has been washed with fabric softener.
Another potential source is using artificially softened water. Some home water softening systems work by replacing “hard” minerals like calcium and magnesium with sodium ions. This type of water can have a distinctly “slippery” or “soapy” mouthfeel on its own, a characteristic that will transfer directly to the whisky upon dilution. This reinforces the importance of using a neutral, low-mineral spring water or distilled water for tasting.
Finally, and most critically, one should never add water directly to the bottle of whisky. Diluting the entire bottle is an irreversible act. It permanently alters the spirit’s character and, more importantly, halts the slow, subtle process of oxidation that occurs in the bottle after it’s been opened. Distillers painstakingly reduce their spirits to a specific bottling strength for a reason. Any further dilution should happen in the glass, on a dram-by-dram basis, allowing you to enjoy the whisky as the master blender intended, while also giving you the freedom to experiment with each serving.
Key Takeaways
- The “opening up” of whisky is a physical chemistry event where adding water forces flavor-bearing amphipathic molecules (like guaiacol) to the liquid’s surface, making them easier to smell.
- There is an aromatic sweet spot for dilution, with studies pointing to an optimal concentration around 27% ABV. Over-diluting beyond this point will drown the aromas and make different whiskies taste alike.
- Precision is paramount. Use a pipette to add water drop by drop, and always use a soft, neutral, low-mineral water to avoid introducing unwanted flavors from chlorine or hard minerals.
Why Stirring for 30 Seconds Dilutes Less Than Shaking for 10 Seconds?
The principles of dilution extend beyond neat spirits and are fundamental to the art of cocktail making. A common point of confusion is how two different chilling methods, stirring and shaking, result in different levels of dilution, even over different time scales. The answer lies in thermodynamics and surface area. Shaking is a far more violent and efficient process for chilling and dilution than stirring.
When you shake a cocktail, you are breaking the ice into smaller shards and chips. This dramatically increases the total surface area of the ice that is in contact with the liquid. More surface area means a faster rate of heat transfer, so the drink chills more rapidly. It also means more of the ice melts into the drink in a shorter amount of time. The violent agitation also incorporates tiny air bubbles, giving shaken drinks their characteristic cloudy appearance and lighter texture.
Stirring, by contrast, is a gentle process. The large ice cubes remain mostly intact, preserving a much smaller total surface area. The liquid flows around the ice, chilling gradually and with significantly less melting. The goal of stirring is to chill and dilute with control and precision, maintaining the silky texture and clarity of an all-spirit cocktail like a Martini or a Manhattan. Because of this difference in efficiency, a vigorous 10-second shake can easily add more water to a drink than a gentle 30-second stir. As a general rule, stirred cocktails typically incorporate about 20-25% water, while shaken cocktails can reach 30-40% or even more.
The temperature of the ice itself also plays a role. Colder, denser ice (from a specialized mold) will melt more slowly than warmer, “wetter” ice (from a standard freezer tray), giving the bartender even greater control over the final dilution. This is why professional bartenders are so particular about their ice programs.
How to Calculate Dilution to Hit the Perfect ABV for a Martini?
For a spirit-forward cocktail like the Martini, achieving the correct dilution is not just important; it is everything. The goal is to chill the drink to the perfect temperature while adding just enough water to soften the alcohol’s edge and allow the delicate botanicals of the gin and the nuanced aromatics of the vermouth to harmonize. Too little dilution and the drink is harsh and “hot”; too much and it becomes a watery, insipid disappointment.
Professional bartenders and cocktail chemists know that the “sweet spot” for a well-made Martini is a final alcohol by volume (ABV) of around 22% to 28%. A 2023 analysis by a prominent bartender, Jeffrey Morgenthaler, confirms this range, showing that professional bartenders target a final ABV of 22-28% for an optimally balanced Martini. Hitting this target requires a precise understanding of the initial ingredients and the amount of water added during stirring.
While tasting is the ultimate guide, the dilution can be calculated with surprising accuracy. The formula for the final ABV is:
Final ABV = (Initial Alcohol Volume) / (Total Final Volume)
To use this, you must first calculate the total volume of pure alcohol from your gin and vermouth, and then measure the amount of water added. A practical method used by professionals involves weighing the mixing glass:
- Place your empty mixing glass on a digital kitchen scale and tare it to zero.
- Add your gin and vermouth. Note the initial volume of your ingredients (e.g., 60ml gin at 47% ABV, 15ml vermouth at 18% ABV).
- Add ice and stir for 20-30 seconds.
- Strain the chilled cocktail into a second glass, leaving the ice behind in the mixing glass.
- Place the mixing glass with the melted ice water back on the scale. The weight in grams is almost exactly equal to the volume of water in milliliters that was added to your drink (since 1g of water ≈ 1ml).
With this data, you can calculate your final ABV and adjust your stirring time on the next attempt to consistently hit that perfect 22-28% range, ensuring a flawless Martini every time.
By moving from the simple act of adding a splash of water to a precise, methodical approach, you transform the experience of drinking whisky and cocktails. It is no longer a matter of guesswork, but a fascinating application of physical chemistry that allows you to unlock and control the full aromatic potential of the spirit in your glass. Start today by applying these principles to your next dram.
Frequently Asked Questions on Water and Whisky
Does adding water create soapy flavors in whisky?
No, clean neutral water does not create soapiness. This perception usually comes from residue on poorly rinsed glassware or from using extremely soft water that has been treated with sodium-based softeners, which can have a “slippery” mouthfeel.
Why should you never add water directly to the bottle?
Diluting the entire bottle permanently alters the whisky’s character and stops its slow, ongoing oxidative evolution that occurs after opening. Professional distillers use deionized or distilled water to reduce whisky to its bottling strength; any further dilution should always be done in the glass, per serving.
What type of water creates a slippery mouthfeel?
Water that has been treated with a sodium-based water softener can have a distinct ‘slippery’ or ‘soapy’ texture. This mouthfeel will transfer directly to the whisky when used for dilution, which is why it should be avoided in favor of neutral, low-mineral spring water.